SwiftUIでの音声ファイルのバックグラウンド再生方法を説明する。
結論
以下の具体例のように、XcodeによるBackground Modesの設定と、コードによるAVAudioSessionの設定を行う。
具体例
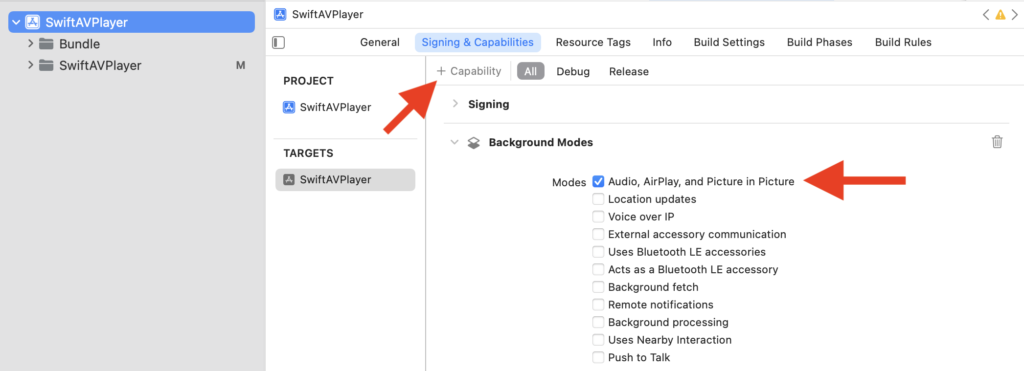
XcodeでTARGETS -> Signing & Capabilities -> +CapabilityをクリックしBackground Modesを選択 -> Audio, AirPlay, and Picture in Pictureにチェックを入れる。
AVAudioSessionのsharedInstance()を.playbackに設定するためのコードを記述する。以下のコードはこの設定をApp起動時に行う例である。
- Appの名前Appのstructに@UIApplication…の行を追記する。これは2を実行するためのコードである。
- 1に呼応するclassを記述する。
- func application(…didFinishLaunching…)を記述する。これはApp起動後に実行される関数である。
- AVAudioSessionのsharedInstance()を.playbackに設定する。
import SwiftUI
import AVKit

@main
struct Appの名前App: App {
    @UIApplicationDelegateAdaptor(AppDelegate.self) var appDelegate  // ? 1
    var body: some Scene {
        WindowGroup {
            ContentView()
        }
    }
}

class AppDelegate: UIResponder, UIApplicationDelegate {              // ? 2
    func application(_ application: UIApplication,                   // ? 3
                     didFinishLaunchingWithOptions launchOptions: [UIApplication.LaunchOptionsKey: Any]?) -> Bool {

        // Get the singleton instance.
        let audioSession = AVAudioSession.sharedInstance()
        do {
            // Set the audio session category, mode, and options.   // ? 4
            try audioSession.setCategory(.playback, mode: .moviePlayback, options: [])
        } catch {
            print("Failed to set audio session category.")
        }

        // Other post-launch configuration.
        return true
    }
}
参考 : https://developer.apple.com/documentation/avfaudio/avaudiosession
まとめ
SwiftUIでの音声ファイルのバックグラウンド再生方法を説明した。

コメント